Android LoginActivity Template
What is Login Activity
Login screen may be first screen of any user authentic app. A login application is the screen asking your credentials like User name and Password to login to some particular application. This Android LoginActivity Template explain you, how to create a simple login screen.
Here is sample code for a login application. It creates a basic application that have static user name and password in java code to login to an application.
To experiment with this Tutorial, you can run this on an actual device or in an emulator.
Step by Step Tutorial
Step 1 : Open the Android studio.
Step 2 : Click on New Project option
Step 3 : Give the name of your application. (for example: AndroidLoginTutorial). Give the Company domain name or you can leave it as. And give the project location.
Note: If you are going to publish this app on Play Store than you should change example keyword from company domain name.

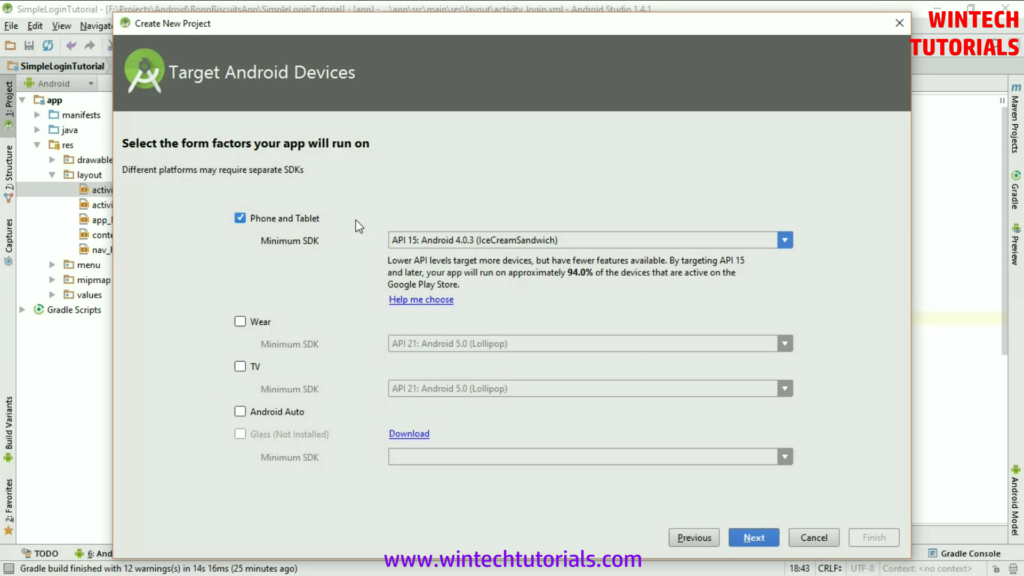
Step 4 : Select the form factor in next screen. Because we are developing app for mobile so we will select first option Phone and Tablet. There is also have Wear, TV and android auto options.
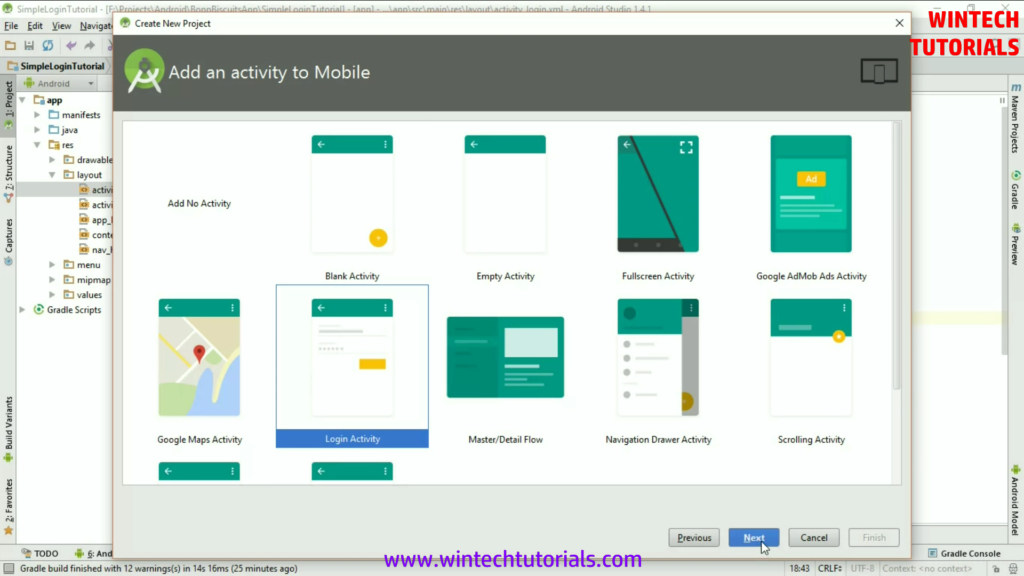
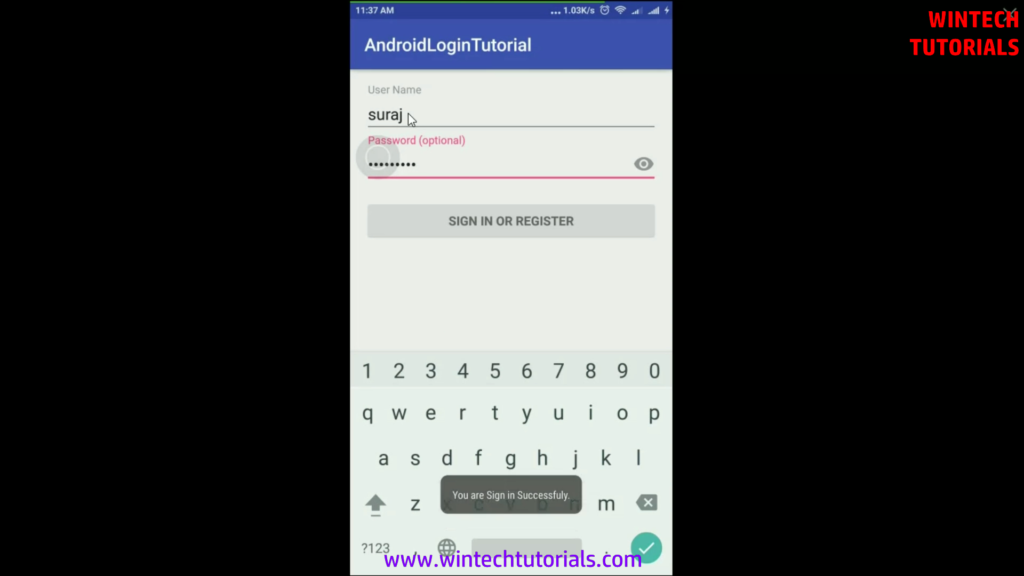
Step 5 : Now select LoginActivity Template from gallery.
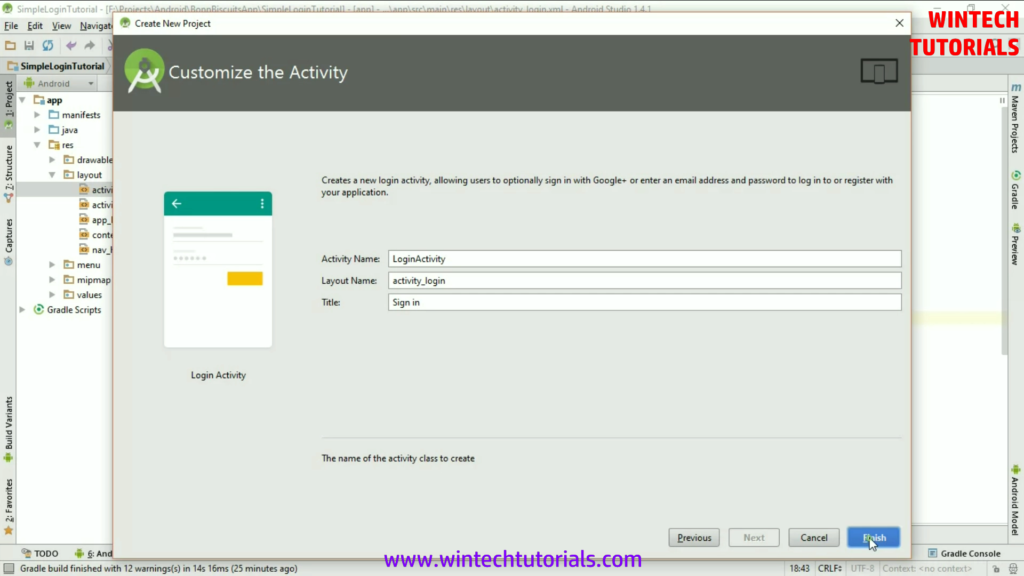
Step 6 : Give Activity Name, Layout Name, and title to selected Activity.
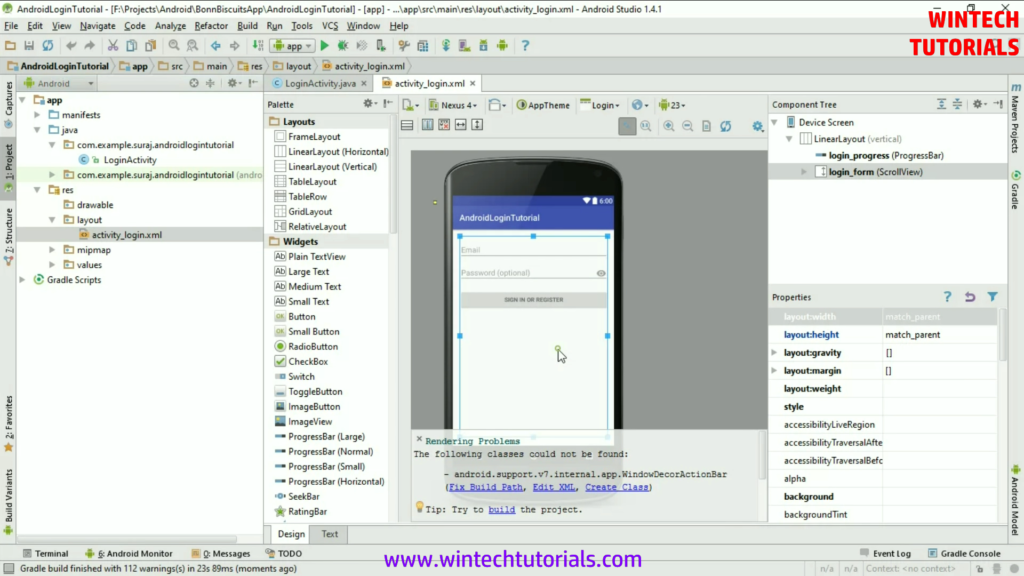
Following image is example of Android Studio IDE Screen. as per image you will see a java class file LoginActivity under java folder and activity_login.xml layout file under res/layout folder. you can also see the preview of your layout in center of screen.
Step 7 : Now add a Navigation Drawer Activity in your project. it will be next screen after user successful login attempts. To add a new Activity in project right click on layout than select new => Activity and click on gallery. see the image:
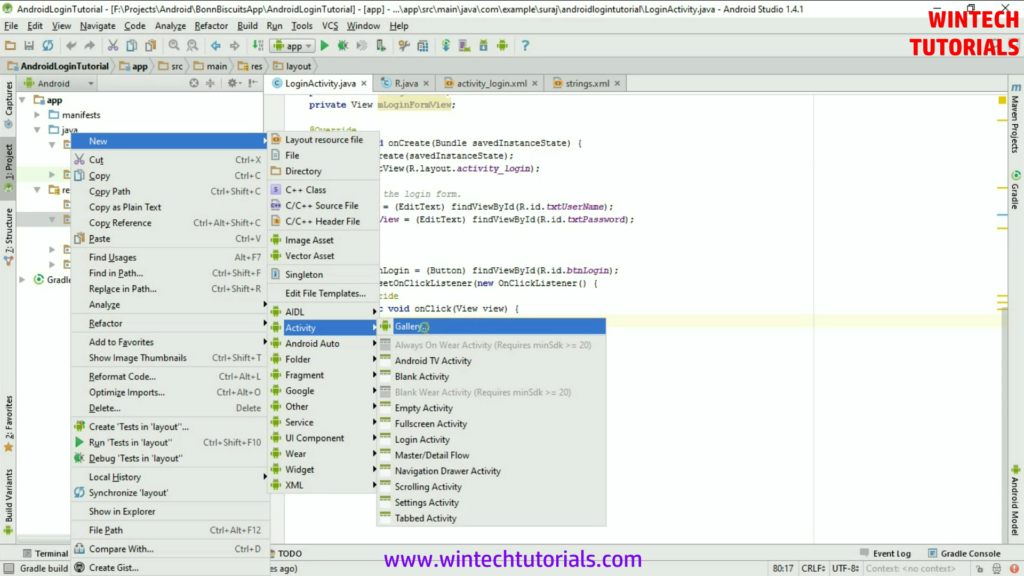
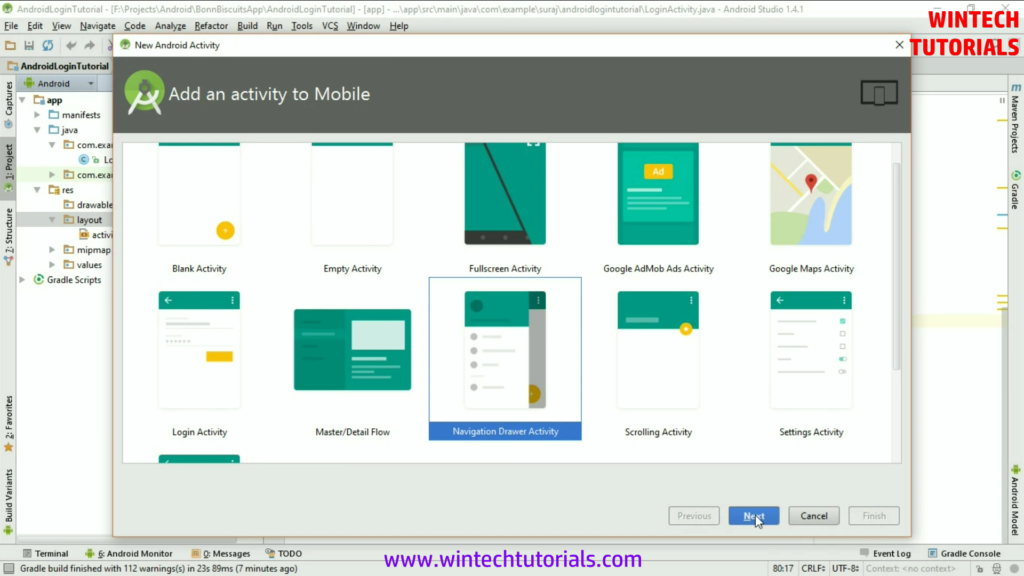
Step 8 : Select Navigation Drawer Activity from gallery and click on next button.
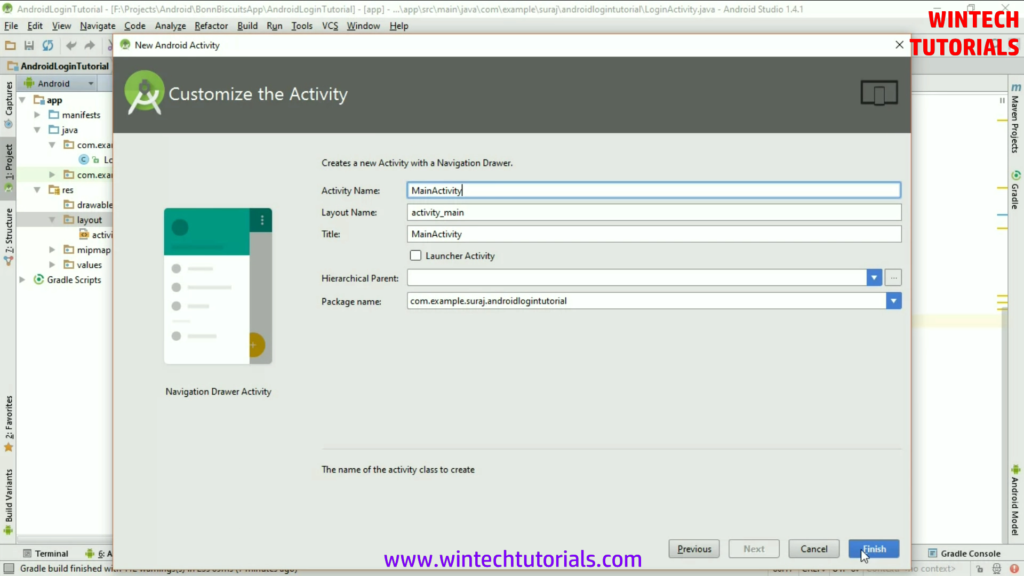
Give the name to selected new activity.
Step 9 : Now make some changes in default activity_login.xml file. I remove the autocomplete email into edit text and change the id’s of control (@+id/txtUserName, @+id/txtPassword, @+id/btnLogin).
Following is the modified content of activity_login.xml
<LinearLayout xmlns:android="http://schemas.android.com/apk/res/android"
 xmlns:tools="http://schemas.android.com/tools" android:layout_width="match_parent"
 android:layout_height="match_parent" android:gravity="center_horizontal"
 android:orientation="vertical" android:paddingBottom="@dimen/activity_vertical_margin"
 android:paddingLeft="@dimen/activity_horizontal_margin"
 android:paddingRight="@dimen/activity_horizontal_margin"
 android:paddingTop="@dimen/activity_vertical_margin" tools:context=".LoginActivity">

<!-- Login progress -->
 <ProgressBar android:id="@+id/login_progress" style="?android:attr/progressBarStyleLarge"
 android:layout_width="wrap_content" android:layout_height="wrap_content"
 android:layout_marginBottom="8dp" android:visibility="gone" />

<ScrollView android:id="@+id/login_form" android:layout_width="match_parent"
 android:layout_height="match_parent">

<LinearLayout android:id="@+id/email_login_form" android:layout_width="match_parent"
 android:layout_height="wrap_content" android:orientation="vertical">

<android.support.design.widget.TextInputLayout android:layout_width="match_parent"
 android:layout_height="wrap_content">

<EditText android:id="@+id/txtUserName" android:layout_width="match_parent"
 android:layout_height="wrap_content" android:hint="@string/prompt_username"
 android:inputType="textEmailAddress" android:maxLines="1"
 android:singleLine="true" />

</android.support.design.widget.TextInputLayout>

<android.support.design.widget.TextInputLayout android:layout_width="match_parent"
 android:layout_height="wrap_content">

<EditText android:id="@+id/txtPassword" android:layout_width="match_parent"
 android:layout_height="wrap_content" android:hint="@string/prompt_password"
 android:imeActionId="@+id/login"
 android:imeActionLabel="@string/action_sign_in_short"
 android:imeOptions="actionUnspecified" android:inputType="textPassword"
 android:maxLines="1" android:singleLine="true" />

</android.support.design.widget.TextInputLayout>

<Button android:id="@+id/btnLogin" style="?android:textAppearanceSmall"
 android:layout_width="match_parent" android:layout_height="wrap_content"
 android:layout_marginTop="16dp" android:text="@string/action_sign_in"
 android:textStyle="bold" />

</LinearLayout>
 </ScrollView>
 </LinearLayout>
Step 10 : Now goto LoginActivity class file in java folder and declare object of Button, EditText int onCreate() method.
        EditText  mUserName = (EditText) findViewById(R.id.txtUserName);
        EditText  mPasswordView = (EditText) findViewById(R.id.txtPassword);
        Button btnLogin = (Button) findViewById(R.id.btnLogin);
Step 11: Add onClick listener event to declared button. use setOnClickListener event in button and do the following code. for example:-
        btnLogin.setOnClickListener(new OnClickListener() {
             @Override
             public void onClick(View view) {
                 String UserName = mUserName.getText().toString();
                 String Pwd = mPasswordView.getText().toString();
                 if(UserName.equalsIgnoreCase("Suraj") && Pwd.equals("Suraj@123")){
                     Intent MainIntent = new Intent(LoginActivity.this, MainActivity.class);
                     startActivity(MainIntent);
                     Toast.makeText(LoginActivity.this,"You are Sign in Successfuly.", Toast.LENGTH_LONG).show();
                 }else
                 {
                     Toast.makeText(LoginActivity.this,"Sorry,User Name or Password is incorrect.", Toast.LENGTH_LONG).show();
                 }
             }
         });
Step 12: delete all unnecessary defined method from LoginActivity class file. your code look like that:-
import android.content.Intent;
 import android.support.v7.app.AppCompatActivity;
 import android.os.Bundle;
 import android.view.View;
 import android.view.View.OnClickListener;
 import android.widget.Button;
 import android.widget.EditText;
 import android.widget.TextView;
 import android.widget.Toast;

 import static android.Manifest.permission.READ_CONTACTS;

 public class LoginActivity extends AppCompatActivity {
     private static final int REQUEST_READ_CONTACTS = 0;

     private static final String[] DUMMY_CREDENTIALS = new String[]{
             "foo@example.com:hello", "bar@example.com:world"
     };

     private EditText mPasswordView, mUserName;
     private View mProgressView;
     private View mLoginFormView;

     @Override
     protected void onCreate(Bundle savedInstanceState) {
         super.onCreate(savedInstanceState);
         setContentView(R.layout.activity_login);

         // declaring obejct of EditText control
         mUserName = (EditText) findViewById(R.id.txtUserName);
         mPasswordView = (EditText) findViewById(R.id.txtPassword);

         Button btnLogin = (Button) findViewById(R.id.btnLogin);
         btnLogin.setOnClickListener(new OnClickListener() {
             @Override
             public void onClick(View view) {
                 String UserName = mUserName.getText().toString();
                 String Pwd = mPasswordView.getText().toString();
                 if(UserName.equalsIgnoreCase("Suraj") && Pwd.equals("Suraj@123")){
                     Intent MainIntent = new Intent(LoginActivity.this, MainActivity.class);
                     startActivity(MainIntent);
                     Toast.makeText(LoginActivity.this,"You are Sign in Successfuly.", Toast.LENGTH_LONG).show();
                 }else
                 {
                     Toast.makeText(LoginActivity.this,"Sorry,User Name or Password is incorrect.", Toast.LENGTH_LONG).show();
                 }
             }
         });

         mLoginFormView = findViewById(R.id.login_form);
         mProgressView = findViewById(R.id.login_progress);
     }
 }
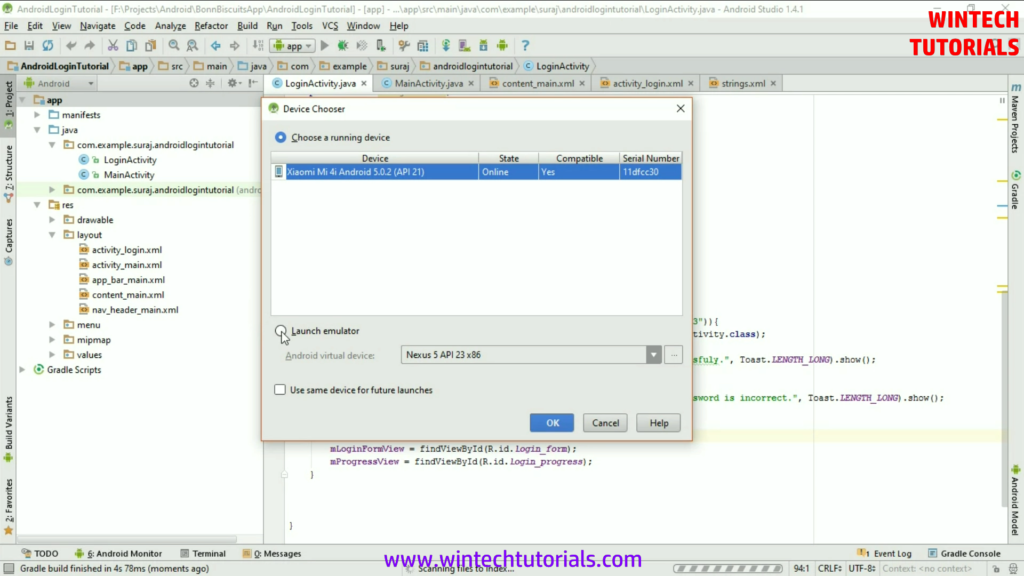
Step 12: Now Debug your code by press Shift + F10 or goto Run => click on Run.
Note: You can select device or Android Emulator to debug your code.

5 thoughts on “Android LoginActivity Template”
So what follows,
Linking a database with usernames and passwords????
what follows afterwards
For database connectivity please see our tutorial http://wintechtutorials.com/blog/android-sqlite-database/
Nice ! Great tutorial ever 😀