
Android SQLite Database
SQLite Database
Android SQLite Database is an open source SQL database that stores data to a text file on a device. Android comes in with built in SQLite database implementation. SQLite Database has methods to create, delete, execute SQL commands, and perform other common database management tasks.
SQLite supports all the relational database features. In order to access this database, you don’t need to establish any kind of connections for it like JDBC, ODBC etc.
Here is a simple Method to create a SQLite Database in android app. In this tutorial you will learn how to create Sqlite database in Android app and save the value from input boxes or EditText to database Table.
Before start I hope you created blank android project (if not please see our previous post: How to make a login screen).
Creating a Project
In this tutorial i will make a form which have Employee information and save this information into database. Firstly create a layout to fill employee information I create a new empty Activity from Gallery and change the layout. After create layout I create a blank class file.
Step by Step Tutorial
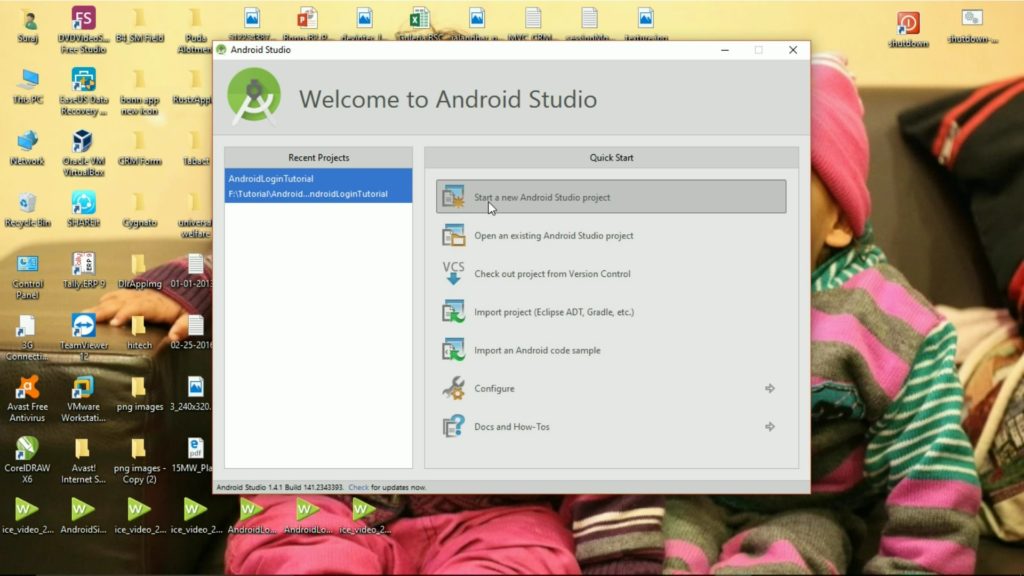
Step 1: Open Android Studio and click on new project
Step 2: Give the name, domain, and projec location to new project.

Step 3: select the device type for which you are developing app. because we are going to make app for mobile so i select phone and tablet option and click on Next button.

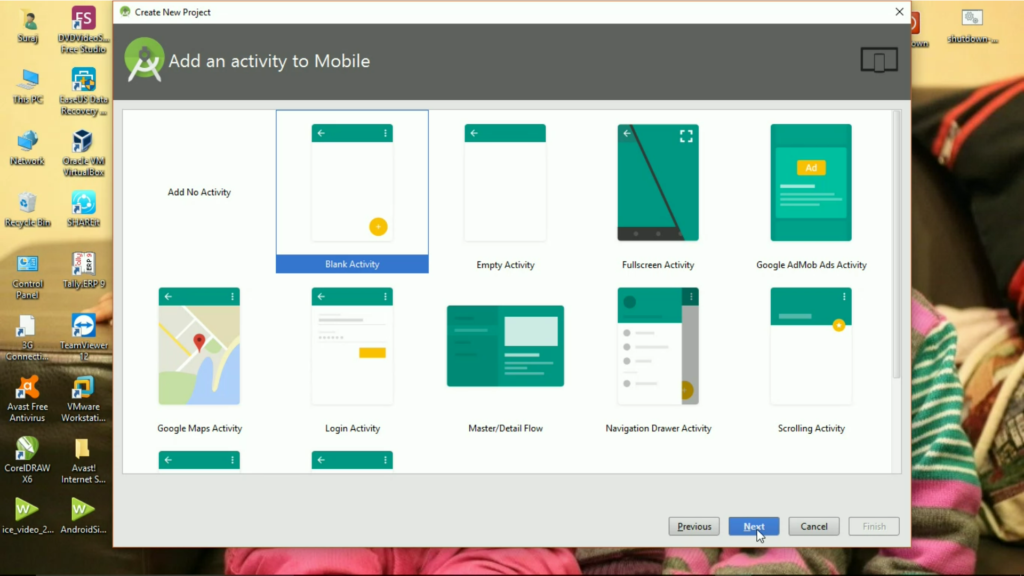
Step 4: Now select an Activity from template gallery. Select a blank activity and click on Next button.
Step 5: In next screen give the name of activity name, layout name, title name and click on Finish button.

After Gradle building complete successful, you will see the Android Studio IDE screen.
Step 6: Right click on your project package name under java folder.
Right click on package name => New => Java Class
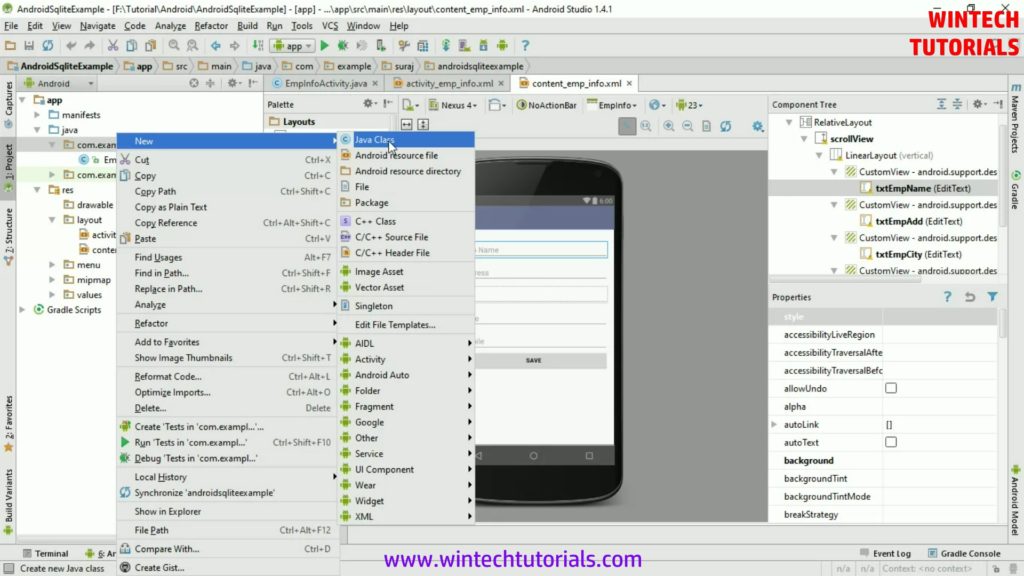
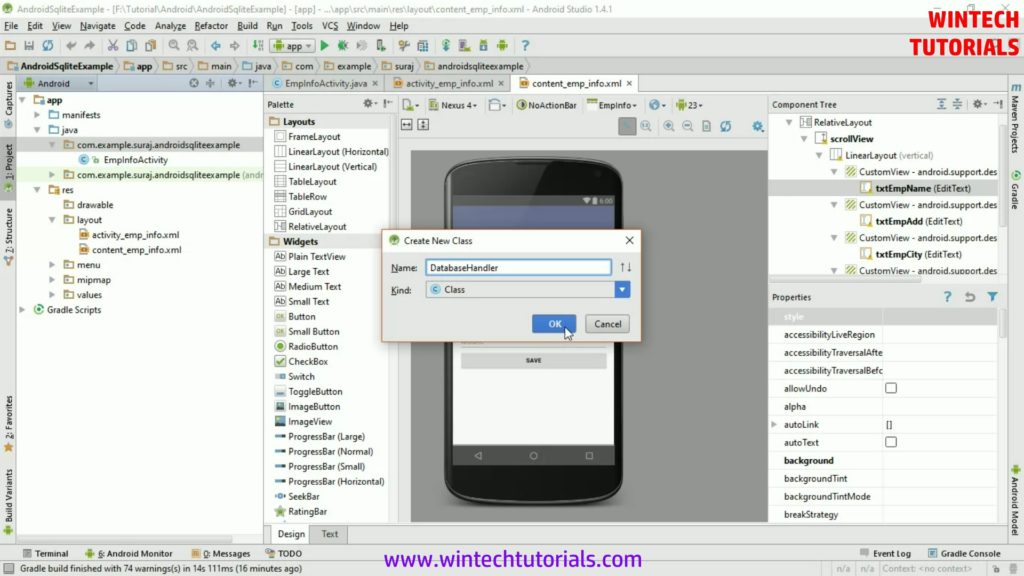
Step 7: Give the name to new java class file (example: DatabaseHandler) and click on OK button.
Step 8: In DatabaseHandler java class file firstly define the name, version and Create Table query in a variable. For example:-
private static final int DatabaseVersion=1;
 private static final String DatabaseName="db_testSql";
 private static final String CreateTable_EmpInfo="Create Table EmpInfo(ID Integer Primary Key AutoIncrement,EmpName Text, Address Text,City Text, State Text, Mobile Text, CreatedOn DateTime)";
Step 9: After that Create an Instance of Database. We can call database from its constructor but calling from instance make application so efficiant. It prevent from warning like:
Warning!

A SQLiteConnection object for database '/data/data/.../databases/queueManager' was leaked!
Step 10: To create instance use following code:
private static  DatabaseHandler mInstance = null;
     public static DatabaseHandler getmInstance(Context context){
         if(mInstance==null){
             mInstance = new DatabaseHandler(context.getApplicationContext());
         }
         return mInstance;
     }
Step 11: Insert Record in SQLite database using following method:
    public long insertIntoEmpInfo(String EmpName, String Address, String City, String State, String Mobile){

     SQLiteDatabase db = this.getWritableDatabase();

         ContentValues values = new ContentValues();
         values.put("EmpName",EmpName);
         values.put("Address",Address);
         values.put("City",City  );
         values.put("State",State);
         values.put("Mobile",Mobile);
         values.put("CreatedOn",getDateTime());

         long id = db.insert("EmpInfo",null,values);
         return id;

 }
Step 12: Open content_emp_info.xml layout and add ScrollView, LinearLayout, EditText and Button. User fill the employee detail in EditText and click on Submit Button to save value into database.
<ScrollView
         android:layout_width="match_parent"
         android:layout_height="match_parent"
         android:id="@+id/scrollView" >

         <LinearLayout
             android:orientation="vertical"
             android:layout_width="match_parent"
             android:layout_height="match_parent">

             <android.support.design.widget.TextInputLayout
                 android:layout_width="fill_parent"
                 android:layout_height="match_parent">

                 <EditText
                     android:layout_width="fill_parent"
                     android:layout_height="wrap_content"
                     android:id="@+id/txtEmpName" android:hint="Emp Name"/>

             </android.support.design.widget.TextInputLayout>
             <android.support.design.widget.TextInputLayout
                 android:layout_width="fill_parent"
                 android:layout_height="match_parent">

                 <EditText
                     android:layout_width="fill_parent"
                     android:layout_height="wrap_content"
                     android:id="@+id/txtEmpAdd" android:hint="Address"/>

             </android.support.design.widget.TextInputLayout>
             <android.support.design.widget.TextInputLayout
                 android:layout_width="fill_parent"
                 android:layout_height="match_parent">

                 <EditText
                     android:layout_width="fill_parent"
                     android:layout_height="wrap_content"
                     android:id="@+id/txtEmpCity" android:hint="City"/>

             </android.support.design.widget.TextInputLayout>
             <android.support.design.widget.TextInputLayout
                 android:layout_width="fill_parent"
                 android:layout_height="match_parent">

                 <EditText
                     android:layout_width="fill_parent"
                     android:layout_height="wrap_content"
                     android:id="@+id/txtEmpState" android:hint="State"/>

             </android.support.design.widget.TextInputLayout>

             <android.support.design.widget.TextInputLayout
                 android:layout_width="fill_parent"
                 android:layout_height="match_parent">

                 <EditText
                     android:layout_width="fill_parent"
                     android:layout_height="wrap_content" android:inputType="number"
                     android:id="@+id/txtEmpMobile" android:hint="Mobile"/>

             </android.support.design.widget.TextInputLayout>

             <Button
                 android:layout_width="fill_parent" android:textStyle="bold" android:text="SAVE"
                 android:layout_height="wrap_content" android:id="@+id/btnSubmit" />

         </LinearLayout>
     </ScrollView>
Step 13: Now goto EmpInfoActivity java file and declareobject of DatabaseHandler java file and call the defined instance in Database Handler file in onCreate() method.
private DatabaseHandler db;
db = DatabaseHandler.getmInstance(getApplicationContext());
Step 13: Now create the object of EditText and Button in EmpInfoActivity onCreate() method.
final EditText empName = (EditText) findViewById(R.id.txtEmpName);
 final EditText empAdd = (EditText) findViewById(R.id.txtEmpAdd);
 final EditText empCity = (EditText) findViewById(R.id.txtEmpCity);
 final EditText empState = (EditText) findViewById(R.id.txtEmpState);
 final EditText empMobile = (EditText) findViewById(R.id.txtEmpMobile);

Button btnSave= (Button) findViewById(R.id.btnSubmit);
Step 13: Now setOnClickListener() to Button and code to save the value from EditText to Database
btnSave.setOnClickListener(new View.OnClickListener() {

    @Override
     public void onClick(View view) {

         empname = empName.getText().toString();
         add = empAdd.getText().toString();
         city = empCity.getText().toString();
         state = empState.getText().toString();
         mobile = empMobile.getText().toString();


      // Saving value in to database
        long id = db.insertIntoEmpInfo(empname,add,city,state, mobile);
         if (id>0){
             Toast.makeText(getApplicationContext(), "Employee Information Saved Successfuly.", Toast.LENGTH_LONG).show();
         }else{
             Toast.makeText(getApplicationContext(), "Sorry, No record saved.", Toast.LENGTH_LONG).show();
         }
     }
 });
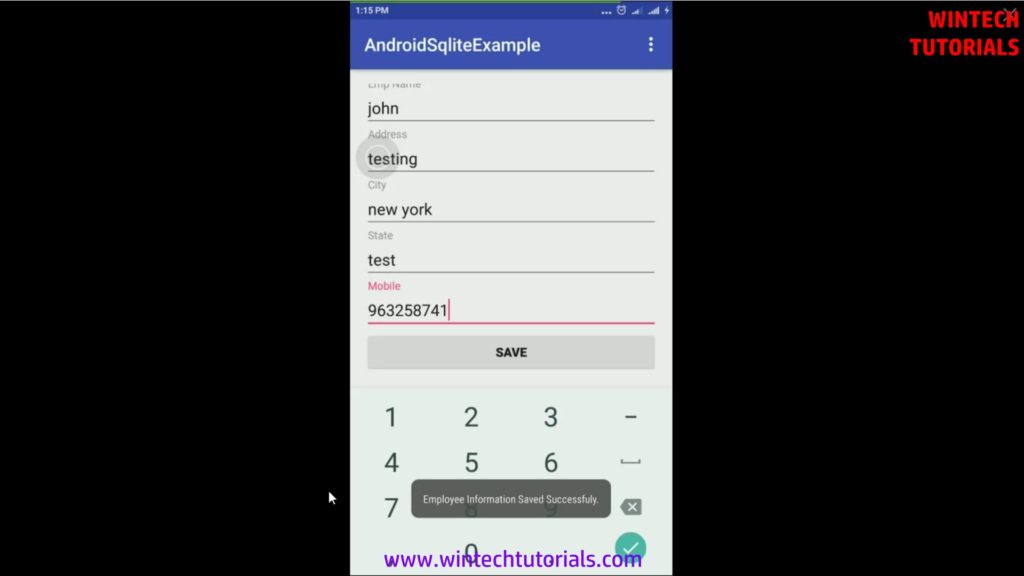
Step 13: Now debug your project and fill the values in EditText or input box. After fill all the detail click on SAVE Button. After Succefuly saving record in database a Toast Message will appear on bottom of screen.
Full Source Code
DatabaseHandler
import android.content.ContentValues;
 import android.content.Context;
 import android.database.sqlite.SQLiteDatabase;
 import android.database.sqlite.SQLiteOpenHelper;

 import java.text.SimpleDateFormat;
 import java.util.Date;
 import java.util.Locale;


 public class DatabaseHandler extends SQLiteOpenHelper {

 // Define the version name of database //
     private static final int DatabaseVersion=1;// Define the name of Database //
     private static final String DatabaseName="db_testSql"; // SQL Query to create Table in Database //
     private static final String CreateTable_EmpInfo="Create Table EmpInfo(ID Integer Primary Key AutoIncrement,EmpName Text, Address Text,City Text, State Text, Mobile Text, CreatedOn DateTime)";

 // Creating Instance of database //
     private static  DatabaseHandler mInstance = null;
     public static DatabaseHandler getmInstance(Context context){
         if(mInstance==null){
             mInstance = new DatabaseHandler(context.getApplicationContext());
         }
         return mInstance;
     }

     public DatabaseHandler(Context context){
         super(context, DatabaseName, null, DatabaseVersion);
     }
     @Override
     public  void onCreate(SQLiteDatabase db){
         db.execSQL(CreateTable_EmpInfo);
     }
     @Override
     public  void onUpgrade(SQLiteDatabase db, int oldVersion, int newVersion){
         onCreate(db);
     }

     //To Get Current Datetime //
     private String getDateTime(){
         SimpleDateFormat dateFormat = new SimpleDateFormat("yyyy-MM-dd HH:mm:ss", Locale.getDefault() );
         Date date= new Date();
         return  dateFormat.format(date);
     }

     //Insert Record in EmpInfo Table //

     public long insertIntoEmpInfo(String EmpName, String Address, String City, String State, String Mobile){

         SQLiteDatabase db = this.getWritableDatabase();

         ContentValues values = new ContentValues();
         values.put("EmpName",EmpName);
         values.put("Address",Address);
         values.put("City",City  );
         values.put("State",State);
         values.put("Mobile",Mobile);
         values.put("CreatedOn",getDateTime());

         long id = db.insert("EmpInfo",null,values);

         return id;
     }

 }
Content_emp_info.xml
<?xml version="1.0" encoding="utf-8"?>
 <RelativeLayout xmlns:android="http://schemas.android.com/apk/res/android"
     xmlns:tools="http://schemas.android.com/tools"
     xmlns:app="http://schemas.android.com/apk/res-auto" android:layout_width="match_parent"
     android:layout_height="match_parent" android:paddingLeft="@dimen/activity_horizontal_margin"
     android:paddingRight="@dimen/activity_horizontal_margin"
     android:paddingTop="@dimen/activity_vertical_margin"
     android:paddingBottom="@dimen/activity_vertical_margin"
     app:layout_behavior="@string/appbar_scrolling_view_behavior"
     tools:showIn="@layout/activity_emp_info" tools:context=".EmpInfoActivity">


     <ScrollView
         android:layout_width="match_parent"
         android:layout_height="match_parent"
         android:id="@+id/scrollView" >

         <LinearLayout
             android:orientation="vertical"
             android:layout_width="match_parent"
             android:layout_height="match_parent">

             <android.support.design.widget.TextInputLayout
                 android:layout_width="fill_parent"
                 android:layout_height="match_parent">

                 <EditText
                     android:layout_width="fill_parent"
                     android:layout_height="wrap_content"
                     android:id="@+id/txtEmpName" android:hint="Emp Name"/>

             </android.support.design.widget.TextInputLayout>
             <android.support.design.widget.TextInputLayout
                 android:layout_width="fill_parent"
                 android:layout_height="match_parent">

                 <EditText
                     android:layout_width="fill_parent"
                     android:layout_height="wrap_content"
                     android:id="@+id/txtEmpAdd" android:hint="Address"/>

             </android.support.design.widget.TextInputLayout>
             <android.support.design.widget.TextInputLayout
                 android:layout_width="fill_parent"
                 android:layout_height="match_parent">

                 <EditText
                     android:layout_width="fill_parent"
                     android:layout_height="wrap_content"
                     android:id="@+id/txtEmpCity" android:hint="City"/>

             </android.support.design.widget.TextInputLayout>
             <android.support.design.widget.TextInputLayout
                 android:layout_width="fill_parent"
                 android:layout_height="match_parent">

                 <EditText
                     android:layout_width="fill_parent"
                     android:layout_height="wrap_content"
                     android:id="@+id/txtEmpState" android:hint="State"/>

             </android.support.design.widget.TextInputLayout>

             <android.support.design.widget.TextInputLayout
                 android:layout_width="fill_parent"
                 android:layout_height="match_parent">

                 <EditText
                     android:layout_width="fill_parent"
                     android:layout_height="wrap_content" android:inputType="number"
                     android:id="@+id/txtEmpMobile" android:hint="Mobile"/>

             </android.support.design.widget.TextInputLayout>

             <Button
                 android:layout_width="fill_parent" android:textStyle="bold" android:text="SAVE"
                 android:layout_height="wrap_content" android:id="@+id/btnSubmit" />

         </LinearLayout>
     </ScrollView>
 </RelativeLayout>
EmpInfoActivity
import android.content.Intent;
 import android.os.Bundle;
 import android.support.design.widget.FloatingActionButton;
 import android.support.design.widget.Snackbar;
 import android.support.v7.app.AppCompatActivity;
 import android.support.v7.widget.Toolbar;
 import android.view.View;
 import android.view.Menu;
 import android.view.MenuItem;
 import android.widget.Button;
 import android.widget.EditText;
 import android.widget.Toast;

 public class EmpInfoActivity extends AppCompatActivity {

     private DatabaseHandler db;
     private String empname,add,city,state, mobile;

     @Override
     protected void onCreate(Bundle savedInstanceState) {
         super.onCreate(savedInstanceState);
         setContentView(R.layout.activity_emp_info);
         Toolbar toolbar = (Toolbar) findViewById(R.id.toolbar);
         setSupportActionBar(toolbar);

         db = DatabaseHandler.getmInstance(getApplicationContext());

         final EditText empName = (EditText) findViewById(R.id.txtEmpName);
         final EditText empAdd = (EditText) findViewById(R.id.txtEmpAdd);
         final EditText empCity = (EditText) findViewById(R.id.txtEmpCity);
         final EditText empState = (EditText) findViewById(R.id.txtEmpState);
         final EditText empMobile = (EditText) findViewById(R.id.txtEmpMobile);


         Button btnSave= (Button) findViewById(R.id.btnSubmit);
         btnSave.setOnClickListener(new View.OnClickListener() {
             @Override
             public void onClick(View view) {

                 empname = empName.getText().toString();
                 add = empAdd.getText().toString();
                 city = empCity.getText().toString();
                 state = empState.getText().toString();
                 mobile = empMobile.getText().toString();

                long id = db.insertIntoEmpInfo(empname,add,city,state, mobile);
                 if (id>0){
                     Toast.makeText(getApplicationContext(), "Employee Information Saved Successfuly.", Toast.LENGTH_LONG).show();
                 }else{
                     Toast.makeText(getApplicationContext(), "Sorry, No record saved.", Toast.LENGTH_LONG).show();
                 }
             }
         });

         Button btnShowList= (Button) findViewById(R.id.btnShowList);
         btnShowList.setOnClickListener(new View.OnClickListener() {
             @Override
             public void onClick(View view) {

                 Intent empList = new Intent(EmpInfoActivity.this, EmpListActivity.class);
                 startActivity(empList);

             }
         });

     }

     @Override
     public boolean onCreateOptionsMenu(Menu menu) {
         // Inflate the menu; this adds items to the action bar if it is present.
         getMenuInflater().inflate(R.menu.menu_emp_info, menu);
         return true;
     }

     @Override
     public boolean onOptionsItemSelected(MenuItem item) {
         // Handle action bar item clicks here. The action bar will
         // automatically handle clicks on the Home/Up button, so long
         // as you specify a parent activity in AndroidManifest.xml.
         int id = item.getItemId();

         //noinspection SimplifiableIfStatement
         if (id == R.id.action_settings) {
             return true;
         }

         return super.onOptionsItemSelected(item);
     }
 }
2 thoughts on “Android SQLite Database”