Android Tabs Fragments (Swipe Tabs )
Android Tab Fragment.
I’ve been recently using the Android Compatibility Library in a project where I found myself in the need for a tabbed layout, in which each of the tab’s children would be a fragment. The usual way to do this is for the activity you need the tabs in to extend TabActivity. However, if you want to use fragments in your activity, you must extend Android Tab Fragments
android.support.v4.app.FragmentActivity
instead. Since Java doesn’t allow multiple class inheritance, you find yourself in a bit of dilemma.
One of the best things about technology is that it keeps on changing. On the same lines recently some significant improvements were made for Android by the means of support library. The new Design Support Library was included in the support repository. This new Android Design Support library features many new UI components like snackbars, floating action buttons and of-course it significantly improves the implementation of Android Tabs. Since Android design support library contains many new UI widgets which were introduced as concepts with material design. I would write separate tutorials for each one of those. Here lets concentrate on the Android tabs example.
Earlier to make tabs in Android, action bar was used. But now with API 21 onwards it has been deprecated. An alternative way to make tabs with full backward support was to use SlidingTabLayout and SlidingTabStrip classes. But now with Android Design Support Library making swipe tabs has become even more simpler. In this Android Tabs example lets explore the power of new design support library.
Step by step Tutorial:
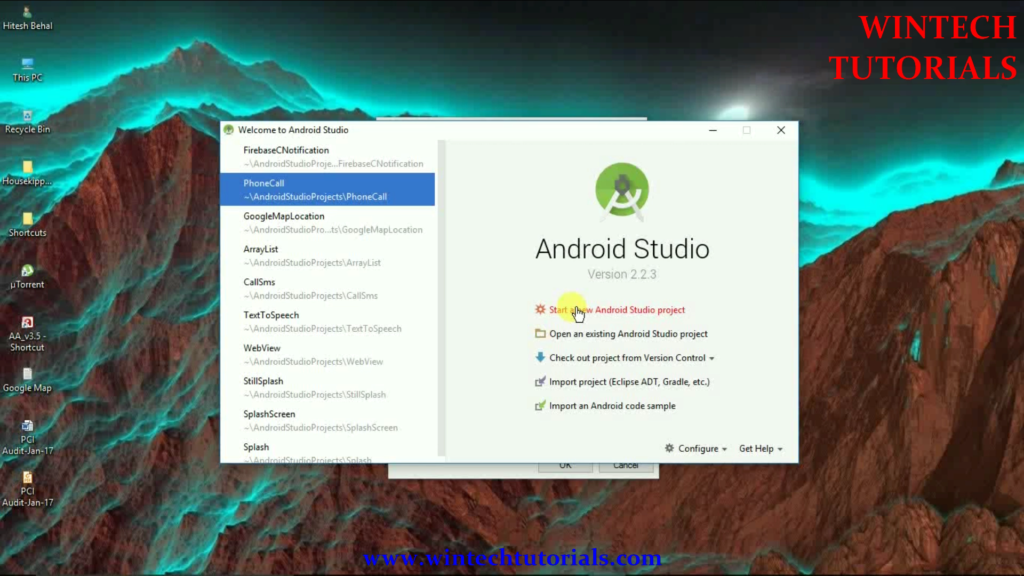
Step 1 : Open the Android studio.
Step 2 : Click on New Project option
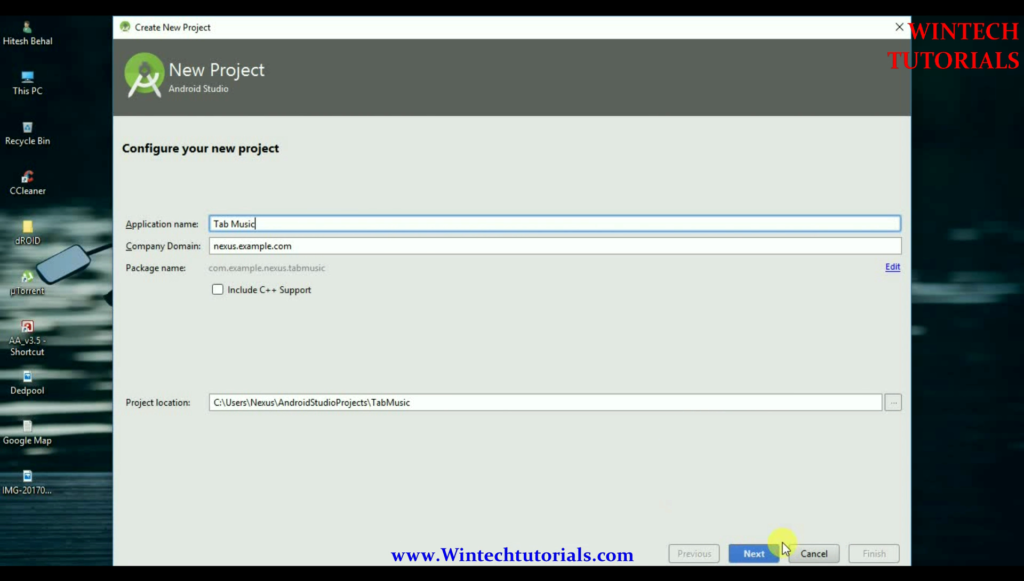
Step 3 : This is called Configure your project where you give a name to your project and define you domain. Give the name of your application. (for example: Tab Music). Give the Company domain name or you can leave it as. And give the project location.
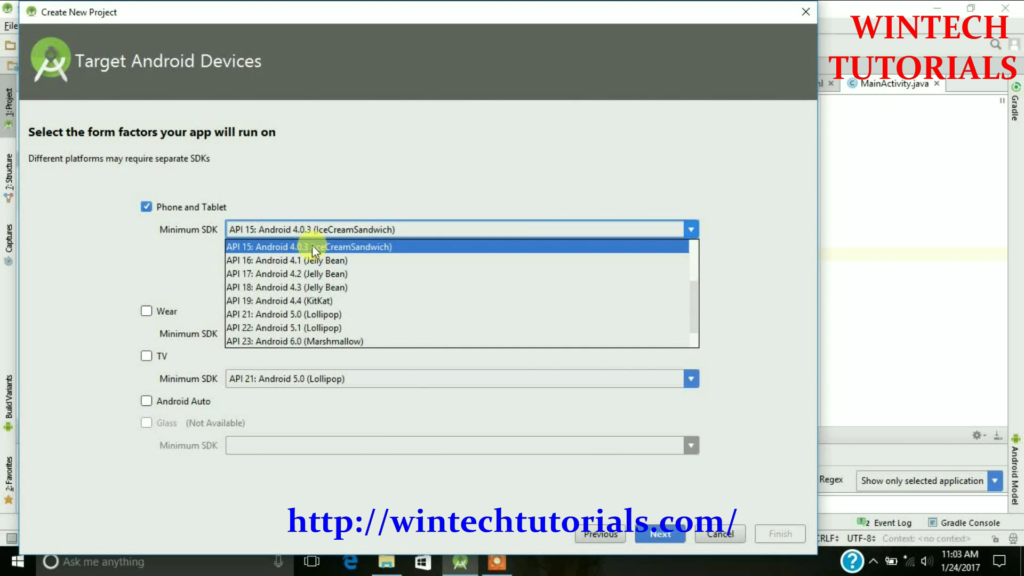
Step 4. After New Project Name Screen there come where you have to choose the particular android version. It implies/ tells us the compatibility of our project in different android platforms. To Study about Available Android Version Click here.
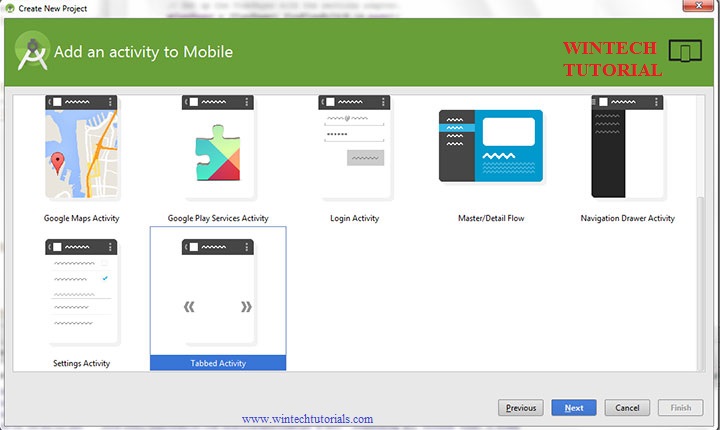
Step 5. In this part you have to select from the provided templates and the result project will be as similar that is displayed on the particular template as follows. It Act as the Main Class of this Project.
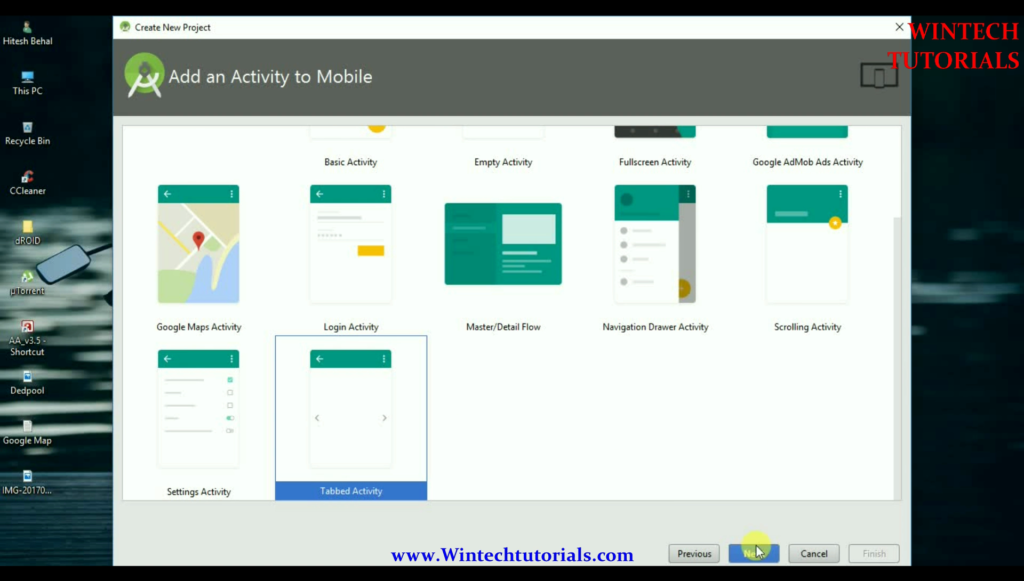
Here we Select the Tabbed Activity where we can do all the coding.
Step 6. Give Activity Name, Layout Name, and title to selected Activity. In this I name It “MainActivity” and the layout name as “activity_main” as well.
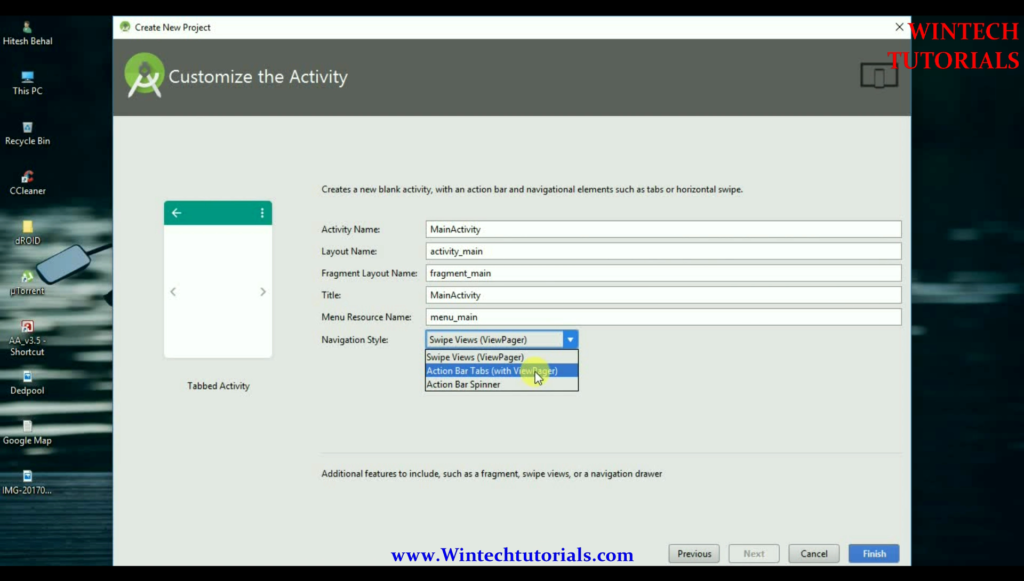
And Make sure you select the Action Bar Tabs(With View Pager) as the navigation Style. and click on finish.
Step 7. After you click on finish button on the last screen then the android will start to build the empty project for you. where you have to design your own layout and implement your own function. once finish it redirect us to the MainActivity.java page.
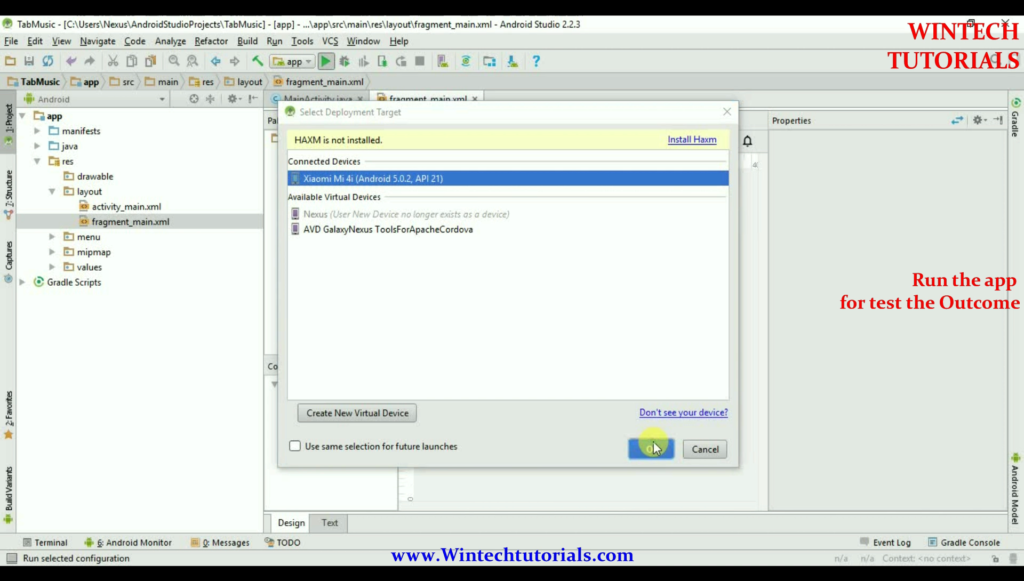
Now run the app as it is without any changes. to see whether it display anything or not.. Click on Run Button and select the device where you want to install the application.
Output:
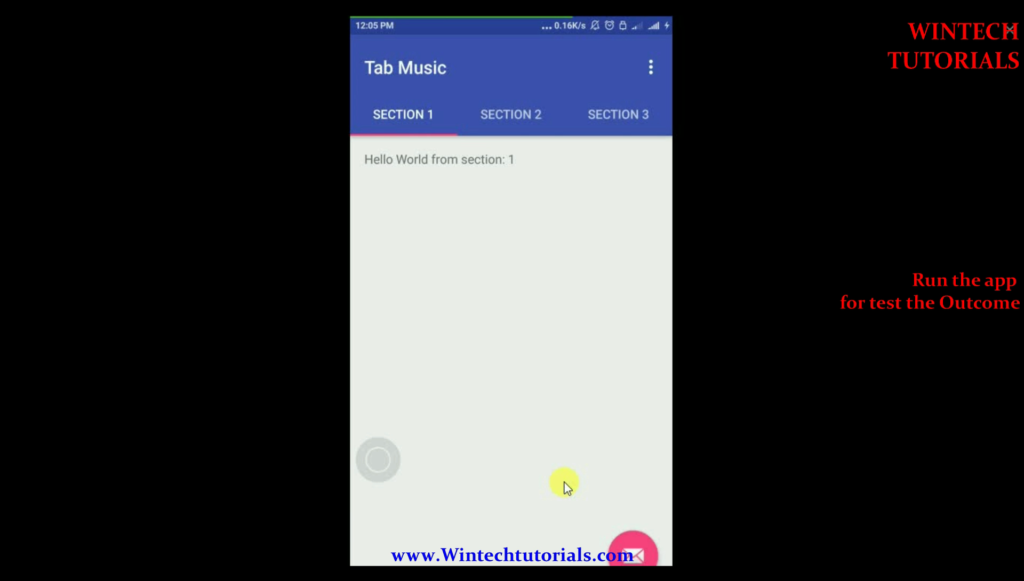
Now after be sure that simple app is run perfectly now we have to do some changes as follows.
Open build.gradle and add android design support library com.android.support:design:25.1.1 and other dependencies as follows.
dependencies {
    compile fileTree(dir: 'libs', include: ['*.jar'])
    androidTestCompile('com.android.support.test.espresso:espresso-core:2.2.2', {
        exclude group: 'com.android.support', module: 'support-annotations'
    })
    compile 'com.android.support:cardview-v7:25.1.1'
    compile 'com.android.support:appcompat-v7:25.1.1'
    compile 'com.android.support:design:25.1.1'
    compile 'com.android.support:support-v4:25.1.1'
    testCompile 'junit:junit:4.12'
}
Here add the CardView for cardVIEW SUPPORT IN application.
Open string.xml located under res ⇒ values and add below styles. The styles defined in this string.xml are common to all the android versions.
<resources>
    <string name="app_name">Music</string>
    <string name="title_section1">R n B</string>
    <string name="title_section2">Reggae</string>
    <string name="title_section3">Rap</string>
    <string name="hello_world">Hello world!</string>
    <string name="action_settings">Settings</string>
    <string name="hello_blank_fragment">Hello blank fragment</string>
</resources>
Coding:
Mainactivity.java
package com.example.nexus.tabmusic;

import android.os.Bundle;
import android.support.v4.app.Fragment;
import android.support.v4.app.FragmentManager;
import android.support.v4.app.FragmentPagerAdapter;
import android.support.v4.app.FragmentTransaction;
import android.support.v4.view.ViewPager;
import android.support.v7.app.ActionBar;
import android.support.v7.app.AppCompatActivity;
import android.view.Menu;
import android.view.MenuItem;
import com.example.nexus.tabmusic.PopMusicFragment;
import com.example.nexus.tabmusic.R;
import java.util.Locale;

public class MainActivity extends AppCompatActivity implements ActionBar.TabListener {
    SectionsPagerAdapter mSectionsPagerAdapter;
    ViewPager mViewPager;
    @Override
    protected void onCreate(Bundle savedInstanceState) {
        super.onCreate(savedInstanceState);
        setContentView(R.layout.activity_main);
        // Set up the action bar.
        final ActionBar actionBar = getSupportActionBar();
        actionBar.setNavigationMode(ActionBar.NAVIGATION_MODE_TABS);

        // Create the adapter that will return a fragment for each of the three
        // primary sections of the activity.
        mSectionsPagerAdapter = new SectionsPagerAdapter(getSupportFragmentManager());
        // Set up the ViewPager with the sections adapter.
        mViewPager = (ViewPager) findViewById(R.id.pager);
        mViewPager.setAdapter(mSectionsPagerAdapter);
        // When swiping between different sections, select the corresponding
        // tab. We can also use ActionBar.Tab#select() to do this if we have
        // a reference to the Tab.
        mViewPager.setOnPageChangeListener(new ViewPager.SimpleOnPageChangeListener() {
            @Override
            public void onPageSelected(int position) {
                actionBar.setSelectedNavigationItem(position);
            }
        });
        // For each of the sections in the app, add a tab to the action bar.
        for (int i = 0; i < mSectionsPagerAdapter.getCount(); i++) {
            // Create a tab with text corresponding to the page title defined by
            // the adapter. Also specify this Activity object, which implements
            // the TabListener interface, as the callback (listener) for when
            // this tab is selected.
            actionBar.addTab(actionBar.newTab().setText(mSectionsPagerAdapter.getPageTitle(i)).setTabListener(this));
        }
    }
    @Override
    public boolean onCreateOptionsMenu(Menu menu) {
        // Inflate the menu; this adds items to the action bar if it is present.
        getMenuInflater().inflate(R.menu.menu_main, menu);
        return true;
    }
    @Override
    public boolean onOptionsItemSelected(MenuItem item) {
        // Handle action bar item clicks here. The action bar will
        // automatically handle clicks on the Home/Up button, so long
        // as you specify a parent activity in AndroidManifest.xml.
        int id = item.getItemId();
        //noinspection SimplifiableIfStatement
        if (id == R.id.action_settings) {
            return true;
        }
        return super.onOptionsItemSelected(item);
    }
    @Override
    public void onTabSelected(ActionBar.Tab tab, FragmentTransaction fragmentTransaction) {
        // When the given tab is selected, switch to the corresponding page in
        // the ViewPager.
        mViewPager.setCurrentItem(tab.getPosition());
    }

    @Override
    public void onTabUnselected(ActionBar.Tab tab, FragmentTransaction fragmentTransaction) {
    }
    @Override
    public void onTabReselected(ActionBar.Tab tab, FragmentTransaction fragmentTransaction) {
    }
    /**
     * A {@link FragmentPagerAdapter} that returns a fragment corresponding to
     * one of the sections/tabs/pages.
     */
    public class SectionsPagerAdapter extends FragmentPagerAdapter {
        public SectionsPagerAdapter(FragmentManager fm) {
            super(fm);
        }
        @Override
        public Fragment getItem(int position) {
            Fragment fragment = null;
            switch(position){
                case 0:
                    fragment = new PopMusicFragment();
                    break;
                case 1:
                    fragment = new PopMusicFragment2();
                    //fragment = new RaggaeMusicFragment();
                    break;
                case 2:
                    fragment = new PopMusicFragment3();
                    //fragment = new RapMusicFragment();
            }
            return fragment;
        }
        @Override
        public int getCount() {
            // Show 3 total pages.
            return 3;
        }
        @Override
        public CharSequence getPageTitle(int position) {
            Locale l = Locale.getDefault();
            switch (position) {
                case 0:
                    return getString(R.string.title_section1).toUpperCase(l);
                case 1:
                    return getString(R.string.title_section2).toUpperCase(l);
                case 2:
                    return getString(R.string.title_section3).toUpperCase(l);
            }
            return null;
        }
    }
}
activity_main.xml
No Changes have been done.
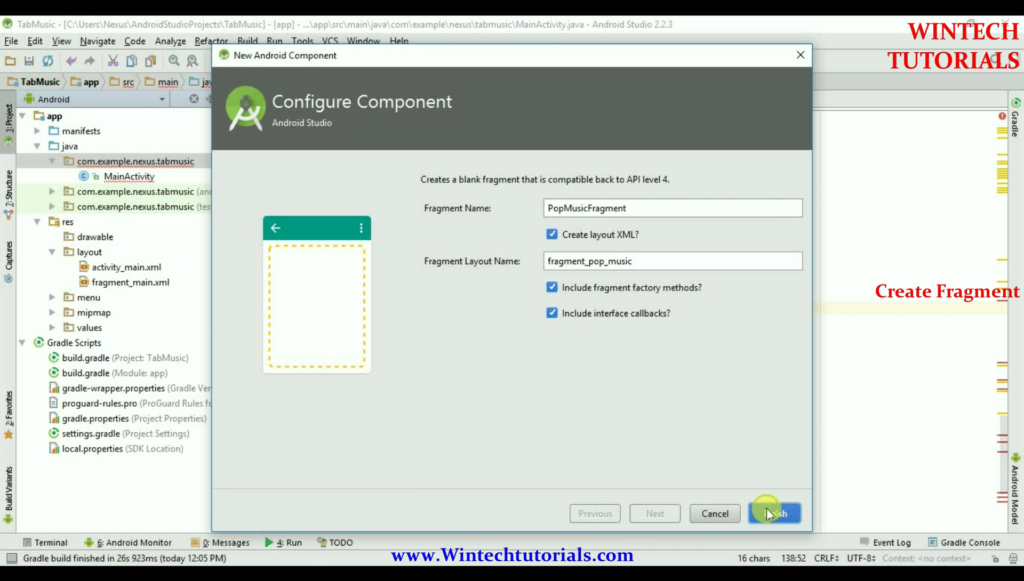
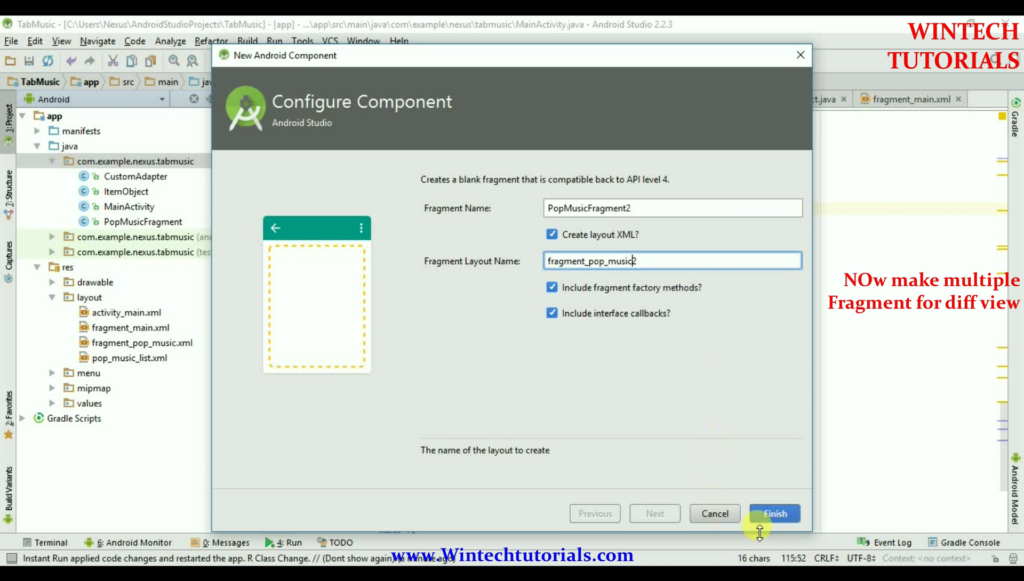
Now Create a Fragment Named PopMusicFragment.java
package com.example.nexus.tabmusic;

import android.content.Context;
import android.net.Uri;
import android.os.Bundle;
import android.support.v4.app.Fragment;
import android.view.LayoutInflater;
import android.view.View;
import android.view.ViewGroup;
import android.widget.AdapterView;
import android.widget.GridView;
import android.widget.Toast;
import java.util.ArrayList;
import android.os.Bundle;
import android.support.v4.app.Fragment;
import android.view.LayoutInflater;
import android.view.View;
import android.view.ViewGroup;
import android.widget.AdapterView;
import android.widget.GridView;
import android.widget.Toast;

import java.util.ArrayList;
import java.util.List;

public class PopMusicFragment extends Fragment {
    public PopMusicFragment() {
    }
    @Override
    public View onCreateView(LayoutInflater inflater, ViewGroup container, Bundle savedInstanceState) {
        View view = inflater.inflate(R.layout.fragment_pop_music, container, false);
        GridView gridview = (GridView)view.findViewById(R.id.gridview);
        List<ItemObject> allItems = getAllItemObject();
        CustomAdapter customAdapter = new CustomAdapter(getActivity(), allItems);
        gridview.setAdapter(customAdapter);

        gridview.setOnItemClickListener(new AdapterView.OnItemClickListener() {
            @Override
            public void onItemClick(AdapterView<?> parent, View view, int position, long id) {
                Toast.makeText(getActivity(), "Position: " + position, Toast.LENGTH_SHORT).show();
            }
        });
        return view;
    }
    private List<ItemObject> getAllItemObject(){
        List<ItemObject> items = new ArrayList<>();
        items.add(new ItemObject(R.drawable.milian,"Dip It Low", "Christina Milian"));
        items.add(new ItemObject(R.drawable.adele,"Someone like you", "Adele Adkins"));
        items.add(new ItemObject(R.drawable.ciara,"Ride", "Ciara"));
        items.add(new ItemObject(R.drawable.gaga,"Paparazzi", "Lady Gaga"));
        items.add(new ItemObject(R.drawable.brown,"Forever", "Chris Brown"));
        items.add(new ItemObject(R.drawable.rihana,"Stay", "Rihanna"));
        return items;
    }
}
Fragment_pop_musix.xml
<?xml version="1.0" encoding="utf-8"?>
<GridView xmlns:android="http://schemas.android.com/apk/res/android"
    android:id="@+id/gridview"
    android:layout_width="match_parent"
    android:layout_height="match_parent"
    android:gravity="center"
    android:horizontalSpacing="4dp"
    android:numColumns="3"
    android:padding="4dp"
    android:scrollbars="none"
    android:stretchMode="columnWidth"
    android:verticalSpacing="4dp" />
Create Item Object and Costume adapter Class as follows.
ItemObject.java
package com.example.nexus.tabmusic;
public class ItemObject {
    private int screenShot;
    private String musicName;
    private String musicAuthor;
    public ItemObject(int screenShot, String musicName, String musicAuthor) {
        this.screenShot = screenShot;
        this.musicName = musicName;
        this.musicAuthor = musicAuthor;
    }
    public int getScreenShot() {
        return screenShot;
    }
    public String getMusicName() {
        return musicName;
    }
    public String getMusicAuthor() {
        return musicAuthor;
    }
}
CustumeAdapter.java
package com.example.nexus.tabmusic;

import android.content.Context;
import android.view.LayoutInflater;
import android.view.View;
import android.view.ViewGroup;
import android.widget.BaseAdapter;
import android.widget.ImageView;
import android.widget.TextView;
import java.util.List;
public class CustomAdapter extends BaseAdapter {

    private LayoutInflater layoutinflater;
    private List<ItemObject> listStorage;
    private Context context;
    public CustomAdapter(Context context, List<ItemObject> customizedListView) {
        this.context = context;
        layoutinflater =(LayoutInflater)context.getSystemService(Context.LAYOUT_INFLATER_SERVICE);
        listStorage = customizedListView;
    }
    @Override
    public int getCount() {
        return listStorage.size();
    }
    @Override
    public Object getItem(int position) {
        return position;
    }
    @Override
    public long getItemId(int position) {
        return position;
    }
    @Override
    public View getView(int position, View convertView, ViewGroup parent) {
        ViewHolder listViewHolder;
        if(convertView == null){
            listViewHolder = new ViewHolder();
            convertView = layoutinflater.inflate(R.layout.pop_music_list, parent, false);
            listViewHolder.screenShot = (ImageView)convertView.findViewById(R.id.screen_shot);
            listViewHolder.musicName = (TextView)convertView.findViewById(R.id.music_name);
            listViewHolder.musicAuthor = (TextView)convertView.findViewById(R.id.music_author);
            convertView.setTag(listViewHolder);
        }else{
            listViewHolder = (ViewHolder)convertView.getTag();
        }
        listViewHolder.screenShot.setImageResource(listStorage.get(position).getScreenShot());
        listViewHolder.musicName.setText(listStorage.get(position).getMusicName());
        listViewHolder.musicAuthor.setText(listStorage.get(position).getMusicAuthor());
        return convertView;
    }
    static class ViewHolder{
        ImageView screenShot;
        TextView musicName;
        TextView musicAuthor;
    }
}
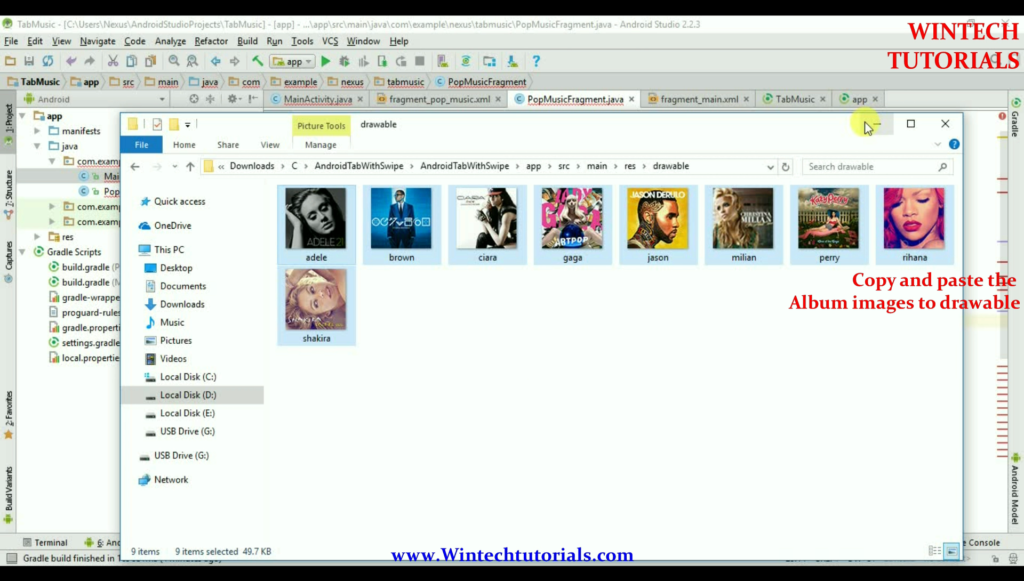
NOw after that Add the images in Drawable file as follows
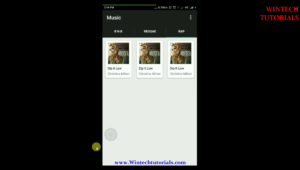
Now Run the application in Device and check the end Result.
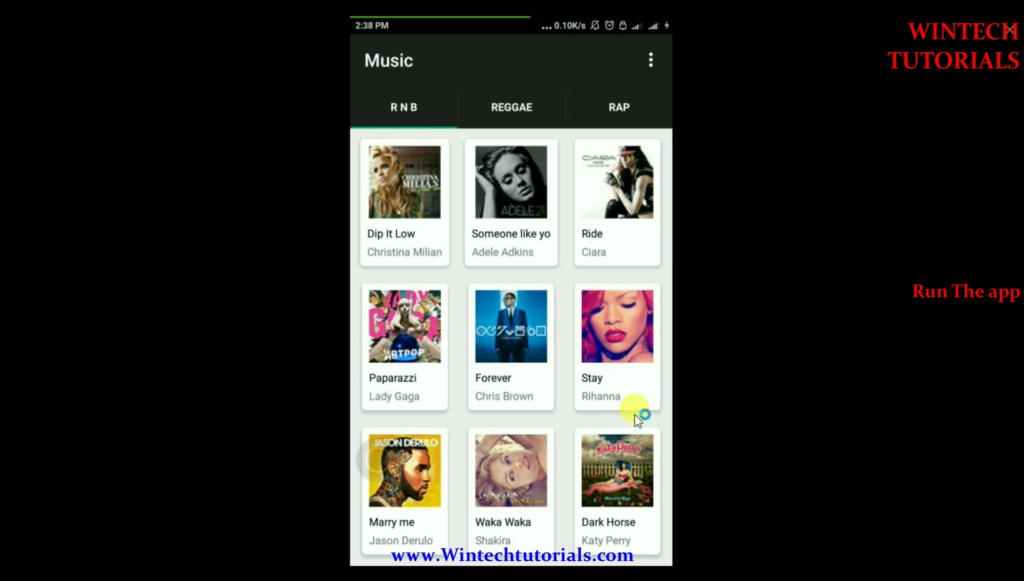
Now Here in all slides the data is same so now we create multiple fragment for diff view in every Page/Slide.
Now In here coding is same the difference is in Array music list in it as follows.
private List<ItemObject> getAllItemObject(){
    List<ItemObject> items = new ArrayList<>();
    items.add(new ItemObject(R.drawable.jason,"Marry me", "Jason Derulo"));
    items.add(new ItemObject(R.drawable.shakira,"Waka Waka", "Shakira"));
    items.add(new ItemObject(R.drawable.perry,"Dark Horse", "Katy Perry"));

    return items;
}
The only changes is done here rest the code is same as the first fragment.
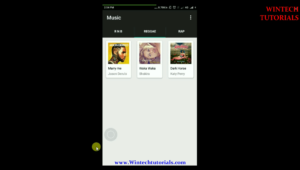
OUTPUT:
So Here we can see all there tabs have there own music album. and its completely different from one another.