Android Phone Call
Android Phone Call.
Android Phone Call provides Built-in applications for phone calls, in some occasions we may need to make a phone call through our application. This could easily be done by using implicit Intent with appropriate actions. Also, we can use PhoneStateListener and TelephonyManager classes, in order to monitor the changes in some telephony states on the device.
This tutorial lists down all the simple steps to create an application which can be used to make a Phone Call. You can use Android Intent to make phone call by calling built-in Phone Call functionality of the Android. Following section explains different parts of our Intent object required to make a call.
Intent Object – Action to make Phone Call
You will use ACTION_CALL action to trigger built-in phone call functionality available in Android device. Following is simple syntax to create an intent with ACTION_CALL action
Intent phoneIntent = new Intent(Intent.ACTION_CALL);
Intent Object – Data/Type to make Phone Call
To make a phone call at a given number 91-000-000-0000, you need to specify tel: as URI using setData() method as follows –
phoneIntent.setData(Uri.parse("tel:91-000-000-0000"));
Step by step Tutorial:
Step 1 : Open the Android studio.
Step 2 : Click on New Project option
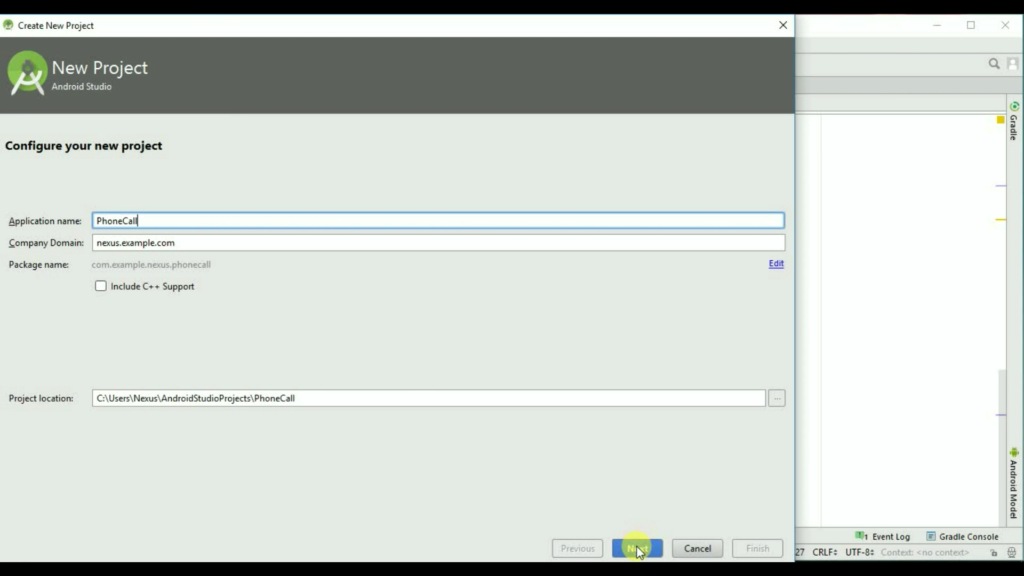
Step 3 : This is called Configure your project where you gibe a name to your project and define you domain. Give the name of your application. (for example: PhoneCall). Give the Company domain name or you can leave it as. And give the project location.
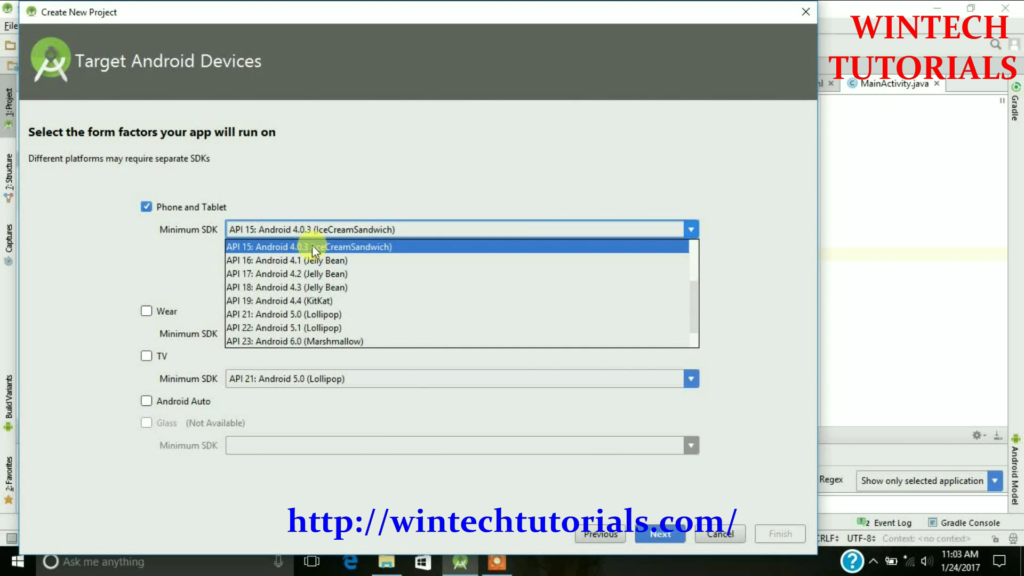
Step 4. After New Project Name Screen there come where you have to choose the particular android version. It implies/ tells us the compatibility of our project in different android platforms. To Study about Available Android Version Click here.
Step 5. In this part you have to select from the provided templates and the result project will be as similar that is displayed on the particular template as follows. It Act as the Main Class of this Project.
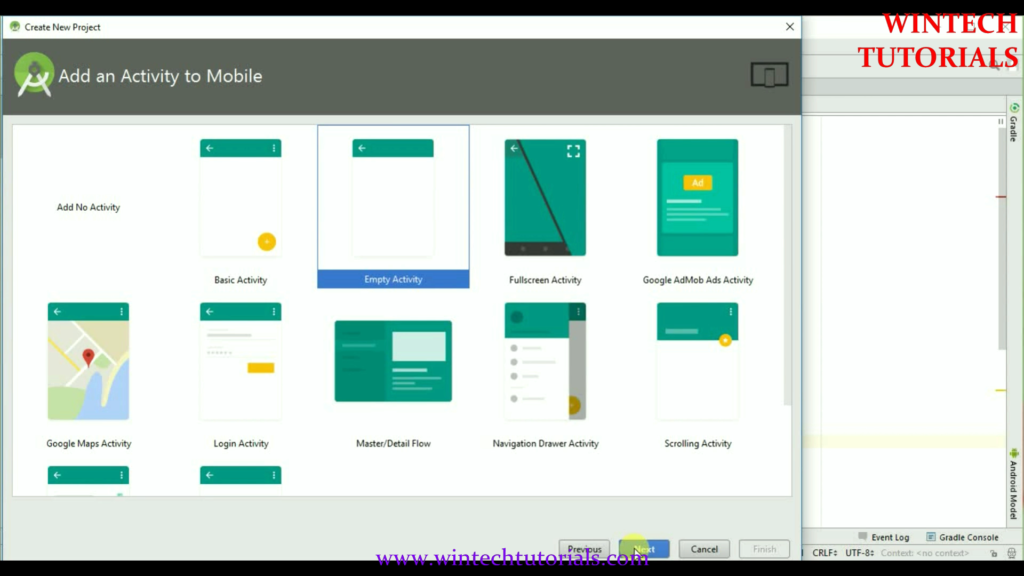
Here we Select the Empty Activity where we can do all the coding.
Step 6. Give Activity Name, Layout Name, and title to selected Activity. In this I name It “MainActivity” and the layout name as “activity_main” as well.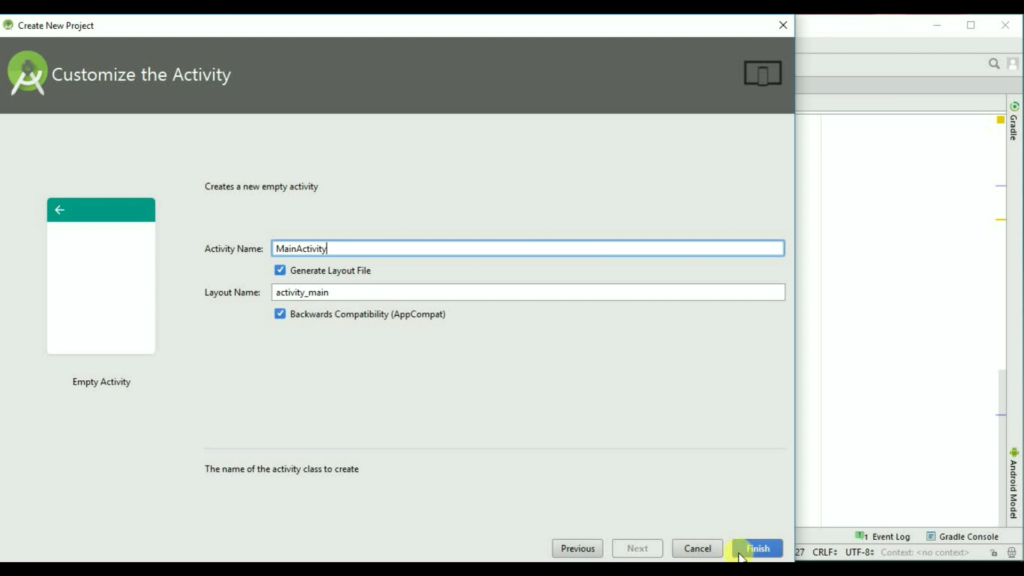
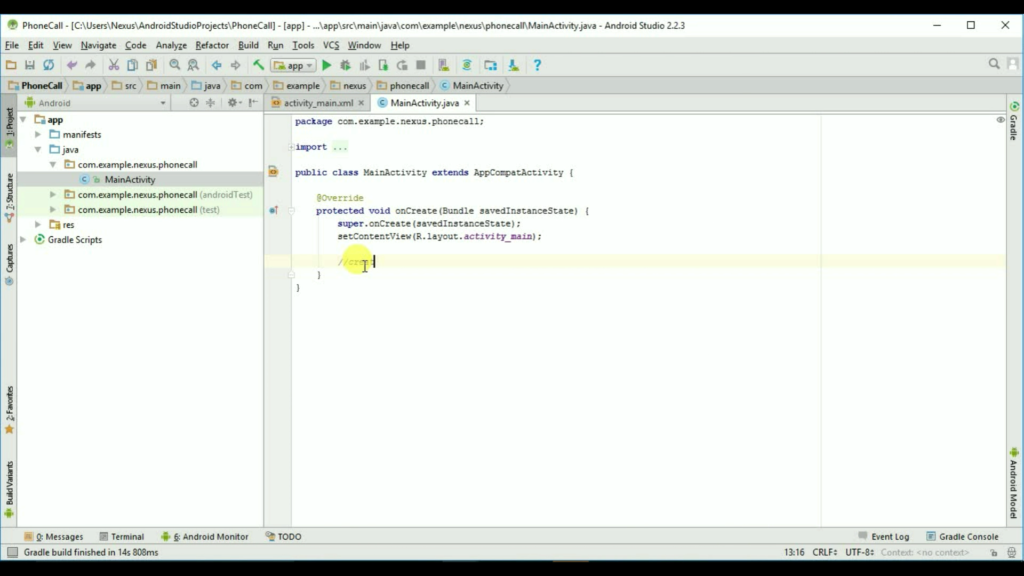
Step 7. After you click on finish button on the last screen then the android will start to build the empty project for you. where you have to design your own layout and implement your own function. once finish it redirect us to the MainActivity.java page. where all the coding part is done.
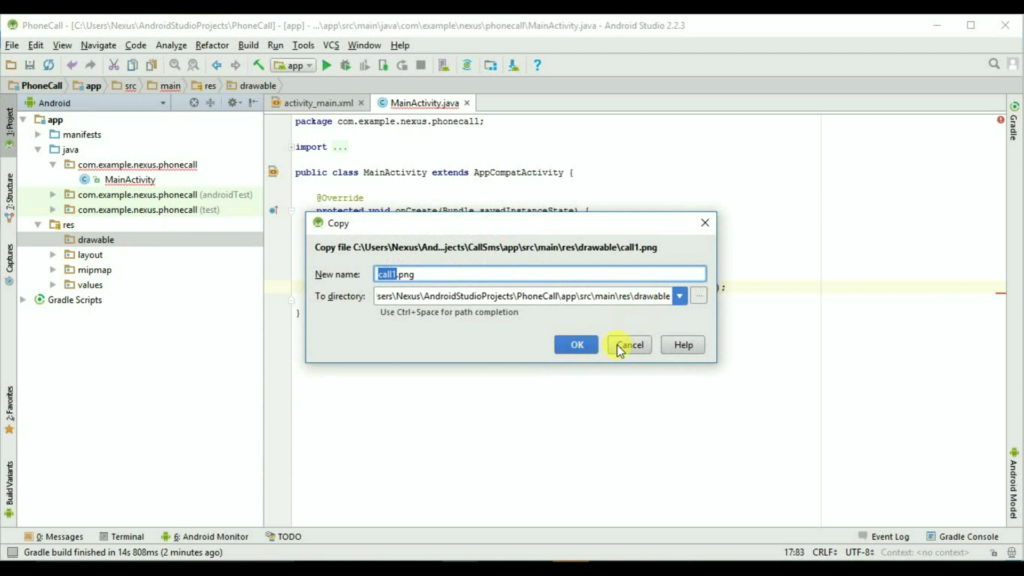
In here I add an Image File (Image View in .xml) and copy that image to the drawable folder as follows,
MainActivity.java full code is at the end of this tutorial.Here we use a image file with .png extension so that there will be no background.
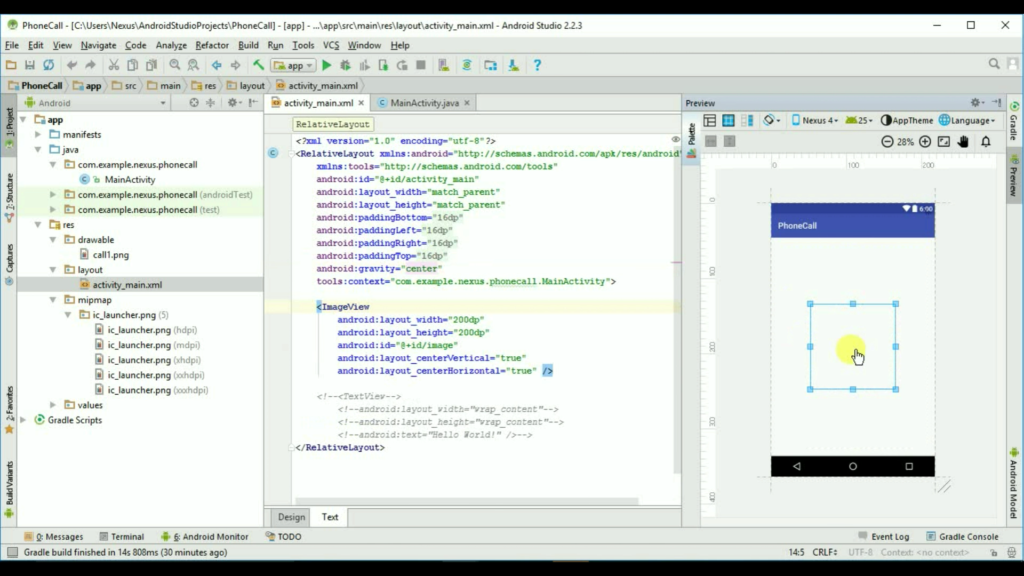
Step8. working on activity_main.xml for the designing part. here i add an ImageView and when you click on image view then it redirect you to the phone call module where the predefined number has been dialed and call has started.
Code for Image File
Bitmap bm = BitmapFactory.decodeResource(getResources(),R.drawable.call1);
.xml code:
<ImageView
 android:layout_width="200dp"
 android:layout_height="200dp"
 android:id="@+id/image"
 android:layout_centerVertical="true"
 android:layout_centerHorizontal="true" />

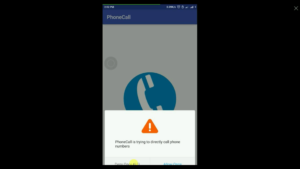
Phone Call Permission Grant:
(ActivityCompat.checkSelfPermission(MainActivity.this, Manifest.permission.CALL_PHONE)!=PackageManager.PERMISSION_GRANTED)
In this when you run your application then the alert message came up and ask you weather you want to grant the permission or deny it.
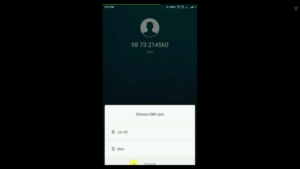
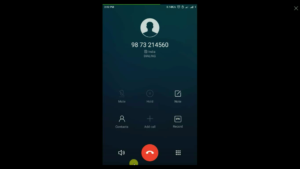
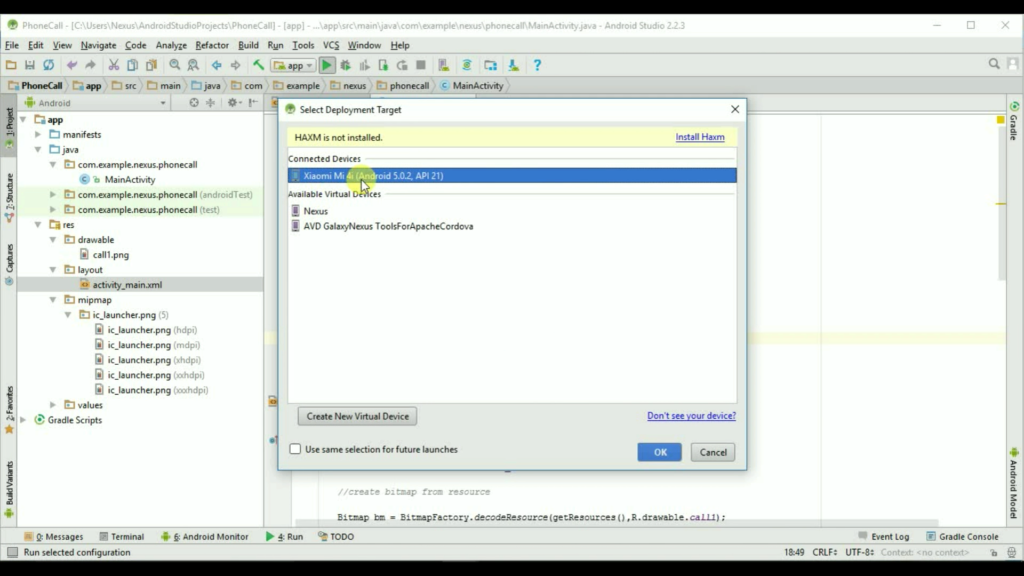
To run the app from Android studio, open one of your project’s activity files and click Run icon from the tool bar. Android studio installs the app on your AVD and starts it and if everything is fine with your set-up and application, it will display following Emulator window –
Here i use the android phone to run the project because Android Emulator takes so much time to process and sometimes it stuck in the process.
Codeing:
AndroidManifest.xml
<?xml version="1.0" encoding="utf-8"?>
<manifest xmlns:android="http://schemas.android.com/apk/res/android"
 package="com.example.nexus.phonecall">
<uses-permission android:name="android.permission.CALL_PHONE" />
 <application
 android:allowBackup="true"
 android:icon="@mipmap/ic_launcher"
 android:label="@string/app_name"
 android:supportsRtl="true"
 android:theme="@style/AppTheme">
 <activity android:name=".MainActivity">
 <intent-filter>
 <action android:name="android.intent.action.MAIN" />
<category android:name="android.intent.category.LAUNCHER" />
 </intent-filter>
 </activity>
 </application>
</manifest>
MainActivity.java
package com.example.nexus.phonecall;

import android.Manifest;
import android.content.Intent;
import android.content.pm.PackageManager;
import android.graphics.Bitmap;
import android.graphics.BitmapFactory;
import android.graphics.Canvas;
import android.graphics.Color;
import android.graphics.Paint;
import android.graphics.PorterDuff;
import android.graphics.PorterDuffXfermode;
import android.graphics.Rect;
import android.graphics.RectF;
import android.net.Uri;
import android.support.v4.app.ActivityCompat;
import android.support.v4.view.PagerAdapter;
import android.support.v7.app.AppCompatActivity;
import android.os.Bundle;
import android.view.View;
import android.widget.ImageView;
public class MainActivity extends AppCompatActivity {

@Override
 protected void onCreate(Bundle savedInstanceState) {
 super.onCreate(savedInstanceState);
 setContentView(R.layout.activity_main);

//create bitmap from resource

Bitmap bm = BitmapFactory.decodeResource(getResources(),R.drawable.call1);

//set circle bitmap

ImageView mimage = (ImageView) findViewById(R.id.image);
 mimage.setImageBitmap(getCircleBitmap(bm));

mimage.setOnClickListener(new View.OnClickListener()
 {
 public void onClick(View arg0){
 Intent callIntent = new Intent(Intent.ACTION_CALL);
 callIntent.setData(Uri.parse("tel:9873214560"));

if (ActivityCompat.checkSelfPermission(MainActivity.this, Manifest.permission.CALL_PHONE)!=PackageManager.PERMISSION_GRANTED)
 {
 return;
 }
 startActivity(callIntent);

}
 });
 }

private Bitmap getCircleBitmap(Bitmap bitmap) {
 final Bitmap output = Bitmap.createBitmap(bitmap.getWidth(),
 bitmap.getHeight(),Bitmap.Config.ARGB_8888);
 final Canvas canvas = new Canvas(output);
final int color = Color.RED;
 final Paint paint = new Paint();
 final Rect rect = new Rect(0,0,bitmap.getWidth(),bitmap.getHeight());
 final RectF rectF = new RectF(rect);
paint.setAntiAlias(true);
 canvas.drawARGB(0,0,0,0);
 paint.setColor(color);
 canvas.drawOval(rectF,paint);
paint.setXfermode(new PorterDuffXfermode(PorterDuff.Mode.SRC_IN));
 canvas.drawBitmap(bitmap,rect,rect,paint);

bitmap.recycle();
 return output;
}
}
activity_main.xml
<?xml version="1.0" encoding="utf-8"?>
<RelativeLayout xmlns:android="http://schemas.android.com/apk/res/android"
 xmlns:tools="http://schemas.android.com/tools"
 android:id="@+id/activity_main"
 android:layout_width="match_parent"
 android:layout_height="match_parent"
 android:paddingBottom="@dimen/activity_vertical_margin"
 android:paddingLeft="@dimen/activity_horizontal_margin"
 android:paddingRight="@dimen/activity_horizontal_margin"
 android:paddingTop="@dimen/activity_vertical_margin"
 android:gravity="center"
 tools:context="com.example.nexus.phonecall.MainActivity">

<ImageView
 android:layout_width="200dp"
 android:layout_height="200dp"
 android:id="@+id/image"
 android:layout_centerVertical="true"
 android:layout_centerHorizontal="true" />

<!--<TextView-->
 <!--android:layout_width="wrap_content"-->
 <!--android:layout_height="wrap_content"-->
 <!--android:text="Hello World!" />-->
</RelativeLayout>
Output: